DIY Magnetic Knife Holder
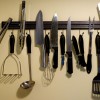
Counter space is a precious commodity for people who cook frequently and have small kitchens. You can free up your kitchen counter with this simple DIY project. Even if you don’t spend time in your kitchen, you can use magnets to create formidable wall art while storing your kitchen utensils. Here’s how to make a magnetic knife holder:
Supplies:
- Wood block
- Drill
- Superglue
- 4-6 Neodymium disc magnets
- Hammer and nails
Directions:
- First, find a wood block to match your kitchen decor. It should be long enough to hold all of your knives and thick enough for the magnets. You should use a rectangular wood block similar to the one in this DIY tutorial for a bottle opener.
- Now, measure your magnets. The disc magnets should be about ½ to ¾ inch in diameter and ⅛ to ¼ inch thick.
- Drill four to six holes into the back of your wood block. The holes should be the same size as the magnets. If you use more than six magnets, you will need to drill more holes. The number of magnets you use depends on how big you want your knife holder to be.
- Glue your magnets into the holes with your super glue and wait for the glue to dry.
- Once the glue has dried, you can secure your new knife holder to the wall using hammer and nails.